Pages

Wednesday, 4 March 2015

Making Anna

It all started so well.  I had plenty of time to make Katie's birthday costume.  Over a fortnight anyway.  Which in Auntie Sandra time is loads.    You may recall she wanted Anna from Frozen.

                                                      
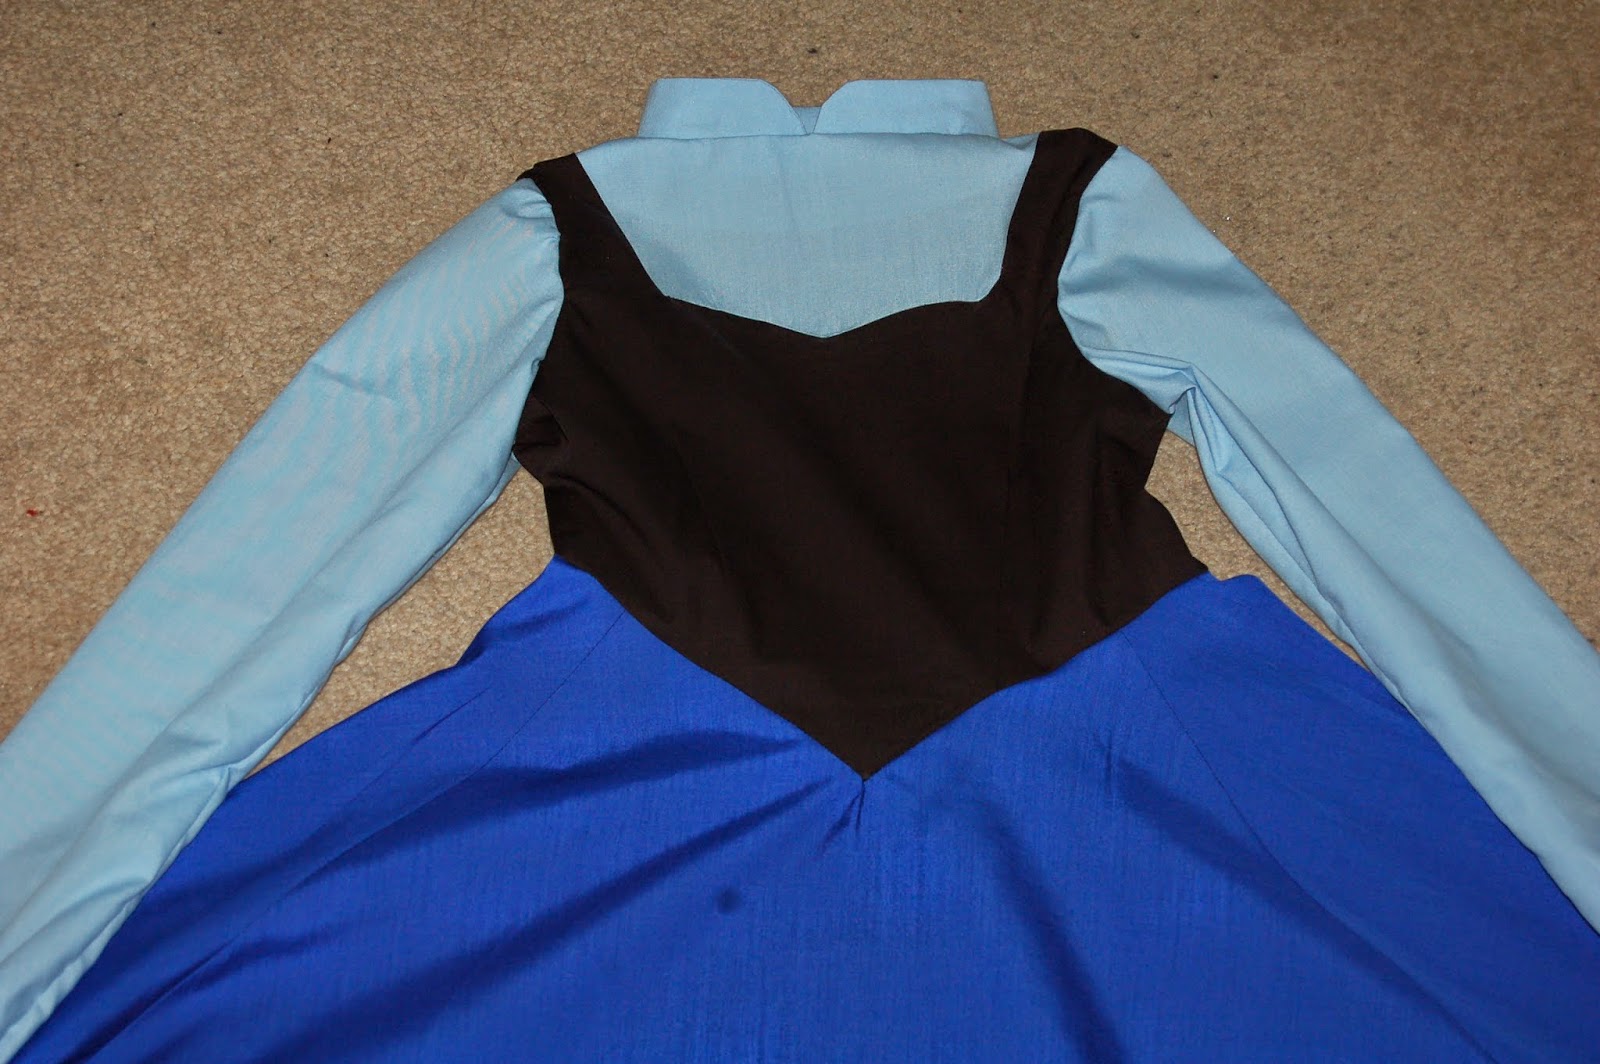
I found a fantastic tutorial on how to make the cape here at Fleeting Thing, along with templates for the dress and skirt patterns.  I was going to do the whole outfit as they had, with separate skirt, top and waistcoat.  But  decided instead just to make a dress.  I had some dark blue polycotton left over from a Tardis dress I made a couple of years ago (you may get the story on here one day!), so thought I'd just make the rest of the dress from polycotton too.  The cape was more difficult.  It's really difficult finding fabric in that weird pinky/purple colour.  I found some stretch bengaline in the right colour.  I also had no idea what bengaline was, but thought I'd just have to make it work!  Turns out it's great for a cape.  It does have a bit of a stretch, but just enough to help you ease shapes together.  It's also quite heavy, and good for swishing.

Materials arrived and I drafted and cut out pattern pieces.  I did start timing myself to see how long it would take to do a project.  It took three hours to draft, cut and sew the bodice.


It took another hour to draft, cut and sew the skirt.


At this point I managed to leave the timer running overnight.  By the time I found it I'd apparently been working for fifteen hours.  I abandoned the timing exercise!

It was when I started on the cloak that it all went wrong.  I made the capelet to try on Katie.  I thought it was probably the wrong size, but it was a good starting point.  It turns out I needed to add an extra three inches to the back and front pieces.  It turns out our Little Mermaid is quite broad shouldered!  I was all set to make another capelet when I lost a week.  Careless of me I know!  I still have no idea how I managed it, especially when I knew that February only had 28 days.  But there it is.  One day I thought I had over a fortnight to just relax and sew at my own pace, the next I had a week.  I had a meltdown panic!  I think my other half did a very good job of not throttling me.  Instead he just rolled his eyes a bit and came with me to the local craft shop to get more bits and pieces.

It turns out that I had not read all of the instructions on cape making.  Rookie mistake.  It required putting bias binding around the raw edges.  Instead I had a go at a rolled hem.  My sewing machine didn't appreciate this decision.  It chewed fabric and pulled thread.  It did not look good.  Hence the trip to the craft shop.

After cape making it was decorating time.  I'd bought some paints to do the designs on the front of the bodice and on the skirt.  Unfortunately it turned out that they weren't all suitable for dark fabrics.  I ended up doing what I swore I would never do.  I did hand embroidery!!  I've never done it before, so why not learn front and centre of a garment that's going to be a present?!  The first flower was a bit shaky...

  
But I think you'll agree the second one worked better...


If only the same could be said for my painting!  On the bodice I used the template from Fleeting Thing, but I had to change the size a little.  I made templates for the pattern on the skirt and cape.  Making good use of a small dinner plate for the curves at the bottom.  It's all hi-tech in my house!  I chalked the outlines and then painted free hand.


It took quite some time to get around that skirt.  I had to paint a couple of repeats, wait for it to dry and then move it around a bit.  We were jumping over wet paint all weekend.

Anyhow, after several disasters, here's the completed dress


and cape


Check out those pom poms!  And it's ready in time for Katie's birthday.  Woo hoo.  I've just finished making the matching hat from Fleeting Thing.    I made a quick hat to get Katie to try on.  It looked like it was made for a doll!  Katie's theory was "I'm really skinny, so I have a small head!".  You've got to love her logic.  It was a touch small, but not as bad as feared.  I added a bit more room to the pattern pieces, and now it's good to go.  I'm not sure we'll manage to persuade Katie to actually wear it however!

Tuesday, 17 February 2015

Belated Photos


Yes I know it's the middle of February, but we finally have photos of Maleficent and mermaid costumes!  Better late than never.  Possibly.

First up we have the lovely Charlotte as Maleficent.


We think we need to add some kind of strap to the headdress to keep it on the poor bairn.  It's a wee bit wobbly.  It's a bit like Charlotte's trying to do posture exercises by balancing it on her head.  It's also slightly out of proportion but I'm sure she'll cope.

And then we have the ever charming Katie as Ariel.


She really did fit into that ridiculously sized tail.  That's her sitting on a rock pose by the way.  Fetching, don't you think?  I'm particularly loving the massive white bandage/plaster on her thumb.  Knowing Katie she probably had a paper cut,or something equally as dramatic!

I'm waiting for a parcel of fabric as we speak.  It's Katie's birthday in a couple of weeks (Yikes!).  When asked what she wanted her first reply was a rabbit.  I'm afraid Auntie Sandra can't oblige there, but we settled on Anna's winter outfit from Frozen.


And we definitely need the cape.  Fortunately I've found a fantastic tutorial.

Saturday, 24 January 2015

Flippin' your fins you don't get too far

When asked what she wanted for Christmas, Katie just kept coming up with the same answer.  A mermaid tail she could wear in the bath!  Back to that old chestnut again.  Obviously more thought had gone into it this year.  She'd even worked out how I could make it (a mini Auntie Sandra in the making?).  Apparently I could just get some of that black stuff (scuba material) and attach some flippers to the bottom!  I mean, how stylish would that be?  She was determined that she be able to wear it in the bath.

After looking online I discovered many people selling mermaid tails suitable for swimming, not just for use in a bath!  We thought this was going a bit too far.  She'd look really great pitching up at the local leisure centre!  And I know we live right next to the coast, but it is the North Sea we're talking about.  Turns out that Katie wasn't too far wrong.  People tend to enclose flippers in lycra rather than scuba material though.

The tail was easy enough to make.  I got some green sparkly lycra and some purple lycra (for the shell bra).  I did think about getting a contrast for the waist band and the 'flipper' but just used the wrong side of the sparkly stuff.  I drew around Katie's legs and added a seam allowance.  I put a zip in down one side.  That was another problem with the first tail.  As well as not being able to go in the bath wearing it the poor bairn couldn't zip herself in to cover her legs completely.  The tail part is stiffened with a couple of sheets of craft foam glued together and cut to shape.  It's all high tech in my house!

At this point I took it along for Katie to have a try on.  Mainly because it looked so long and skinny I didn't think anyone would be able to fit into it.  I did tell her that there was plenty of time and fabric to make another one if it didn't fit.  She insisted that one was fine.  One of her little friends was along to play that afternoon and got a sneak preview.  Her friend's verdict was promising.

'Ooh Katie, it's like you've got real scales.'

Katie's was more practical

'At last, I've got a zip!'

After that I just added a waistband.  I made a pattern for the shells for the bra from one of Katie's crop tops.  The straps are just white elastic dyed with tea.  I expect after it's been in the bath a few times they'll be back to white.


Such a tasteful shade of lime green don't you think?  Apparently when Katie's been in the bath the water turns the colour of the sea!  I'm not sure whether it's the dye coming from the lycra or the foam.  Mind you, I think if it was coming from the lycra it would look more like there'd been an incident at a nuclear site!

Sunday, 4 January 2015

Making Maleficent

Happy New Year Everyone!  It's been quiet on the craft front in the Auntie Sandra household.  There was a mad rush before Christmas with outfits for the girls, a table runner for their Mam and bunting with photos on, among other things.  Since then I've been really lazy though and just doing jigsaws that Santa brought, and I don't think I can really count them.

So, after Charlotte's Halloween experience of being a character no-one would recognise (see here) she decided she wanted to be Maleficent for Christmas.  Very festive.  Originally she asked for a dress with the wings and horns, but we compromised with the Christening dress.


So we still needed horns and a train, but no wings.  Thankfully.  I found some black, crinkly fabric to try to get the texture and the 'V' pattern down the centre front and back.  I've never attempted to make anything on the bias before, so why not go for something high profile like the centre front of a dress?  I adapted Simplicity 5520.  When I say adapted, I mean I took out some panels, narrowed the whole dress massively, altered the sleeves and how they were set in the dress, added a big collar,changed the neckline and stuck a big train in the back.  Otherwise it's exactly the same!  After I'd made the changes to the pattern I worked out how much fabric to buy.  Because it was going to be cut on the diagonal of the fabric I ended up doing lots of diagrams and Pythagoras' Theorem came into play.  I also had to hunt out a protractor.  Does everyone do things like this, or is it just me that's that sad?

I remembered to take photos while making, so I'm afraid I will be sharing them.


Front piece pinned on fabric on the bias.


Fronts and backs cut out.


Fronts and backs attached.  You can just about see that I remembered to add interfacing at the neckline.


A close up of the 'V' effect down the centre front.

The sleeves on the original pattern weren't big enough for my purposes.  In the original Maleficent costume the sleeves are attached down the sides of the dress.  If I'd left them as they were the poor child wouldn't have been able the lift her arms up.  Although that might not have been such a bad thing!


The original pattern is on the right.  You can see I basically just stretched the shape out.  Once Charlotte had tried on the dress we discovered the sleeves were too long.


By several inches!  So the sleeves had to come back out to be altered.


I also changed the shape while I was on.


This photo was from before the alteration, but you can see how the sleeves are attached all the way down the side seam.


I did an awful lot of rolled hems on this dress.  On the plus side, I now quite enjoy doing them, although I do still tend to have a couple of false starts each time.

Next up was the the train.  I ended up putting a big triangle into the centre back each side of the zip.  I believe the technical term is godet.  Each triangle was split into three sections and each section has a contrast fabric across the bottom part.  It looks dead easy.  It took me about two days to figure out what I was doing!


The contrast is supposed to be leather.  Charlotte's obviously isn't.

Then came the collar.  Ah, the collar.


Each side has two separate 'petals'.  These petals join at centre front and back.  I thought I needed some sort of triangular shape.  After much experimentation I came up with this shape.


The curve down the right hand side is where it fits to the neckline.  I needed two of those for each top and bottom, in fabric and in stiff interfacing.  Thirty two in all.  Seems a bit excessive, doesn't it?

I did think to start with that I might need to put wire in them to keep their shape.  I didn't in the end.  It would have held the shape better, but I wanted it to be comfortable for Charlotte to wear.  That is after all what it is for.


One side of the finished collar.

After that the dress itself only needed a zip putting in.  So here we have the finished dress.


Front.

Back.  And close up of train.


I'm hoping that if I don't mention to anyone, that they won't notice that some of the grains in the triangles are going the wrong way.  But you're not going to tell anyone, are you?

On to the headdress.  I got to do papier mache.  I think I was about ten when I last did that.  I made some twisted horn shapes out of tin foil.  And blew up a balloon to the size of Charlotte's head.


I then spent several days covered in flour and water glue and newspaper.  After everything was covered and dry I tried the headdress on Charlotte and cut it to shape.  I attached the horns with tape and covered in yet more newspaper.


The horns are slightly wonky and I think they're too big, but I'm proud.

It was then time to get out the glue gun and cover it in fabric.


All ready in time to open on Christmas morning.  I'm just waiting for photos of Charlotte wearing the outfit to show you.

And what did the other niece want for Christmas?  Followers of this blog will know Katie has a bit(!) of a mermaid/Ariel obsession.  This year I caved.  She now has a tail and bra to wear in the bath!  More on that to follow.

Saturday, 22 November 2014

The Terrible Tutus!

Christmas 2013.  The girls both wanted the same outfit (oh how I wished they hadn't).  They'd been watching 'Barbie in the Pink Shoes'.


How tasteful?  All pink and sparkly.  And tutu-like.  I wasn't even sure I could get a pattern for a tutu.  Because I was certain I wouldn't be able to make anything up for this!  Turns out you can get tutu patterns.  Mainly made to measure ones.  But I did find a commercial tutu pattern.


Jalie 2915.  The leotard and skirt are separate.  The leotard has a flap running all the way around to hide the waistband of the skirt.  While I was looking for a pattern I started reading all kinds of advice on making tutus.  It all seemed very complicated.  But the girls had faith in me.  Bless them!  It was then that I came across the website for Valorose Tutus.  I don't think these tutus would have been made without the help and advice from the wonderful Suzanne who runs the site.  In fact I know they wouldn't have been made, and they certainly wouldn't have looked half so impressive.  You see, Katie wanted hers to stick out a lot, and I had no idea how much net I would need.  I plagued the life out of poor Suzanne for about two months with questions and updates.  It turns out that you need A LOT of net for a tutu.

I started with the leotards.  I was amazed at how much easier they were than I thought they would be to make.  The only thing was there was a lot of panels in each one and I got a bit sick making two at a time.  The centre panel I made from shiny lycra, and the rest was made from a velvety lycra.


The straps were made from white elastic that were dyed with teabags.  Again following advice from Suzanne.  I also added lots of sparkles to the front of each leotard.  It's Barbie.  Apparently things can't be too pink or sparkly.


When I took photos of these I kept making sure I had both in the shot at the same time!  I wanted to make sure everyone knew I was making two tutus!  I do apologise to everyone I know about how much I went on about that fact.

On to the skirts.  When doing research I found conflicting advice about how much net I should use in each layer.  It varied from two widths to four widths, each width being 150cm (approx 5' wide).  When I asked Suzanne her advice was 6 widths for the top layer and 5 for the other layers.  That's an awful lot of net.  It basically meant for the top layer I had to gather a rectangle that was 1'x30'!!  This then had to be attached to what was basically a pair of pants with a waist of about 20".  It was a complete nightmare.  When I was trying to gather, my machine kept having a hissy fit and snapping thread.  Then sewing the gathered layers to the pants was even worse.  A low point was the day I snapped 3 needles in ones afternoon.  It's amazing my sewing machine still speaks to me!  We didn't get on well for quite some time after that.  I also needed regular hugs when it wasn't going well.  My usual threat when a project isn't going well is that I'm going to throw it out of the window, I can't tell you how many times I threatened that.


I added yet more sparkles.  I'd like to say that the wide band of sequins was for decoration, but it was more to hide some very dodgy sewing!


With the skirts upside down it's easier to see the different layers and colours.


Both tutus were completed before Christmas.  They did take a roll of wrapping paper each to wrap though!

The girls were definitely pleased.  Here they are doing some 'ballet'.  I know, I know, but they think they look really good.


You just can't beat the combination of tutus and socks can you?  Unless it's Katie's tutu, socks and red ballet shoes comination!  I think you'll agree that Suzanne's advice made much more impressive (and more sticky out) skirts!  Thank you again Suzanne.

Now I suppose I should go and work on this year's Christmas presents...

Tuesday, 11 November 2014

More on Gran's 90th birthday

As well as Gran's picture quilt I also made a matching cushion.  The picture quality is terrible, I'm sorry, but, I was literally walking out of the door with it when I remembered I needed to take a photo.  I perhaps shouldn't have bothered!


It does match the quilt, honest!

We also had a surprise birthday party for her.  Normally my cousin Jayne makes and decorates cakes for family occasions.  This time she had the excuse of having just had a baby.  Some people, the things they do to get out of cake decorating!  Anyway, when this was mentioned a few months ago, I foolishly stepped forward to volunteer. Full of confidence.  I mean how hard could it be?  I should point out at this juncture that my usual decorating method is to put chocolate (or chocolate fudge) on top of the cake and if I'm feeling really fancy (i.e. it's a birthday cake) I add Smarties.


I had a vision in my head of doing something with fondant or sugar paste roses.  I've made roses out of paper before, it can't be too much different, can it?  Turns out it can.  We were going for a purple and silver theme for the party, so I used food colouring to dye some sugarpaste.  I spent days looking like I'd committed some kind of terrible crime.  The red just would not wash off.  It was very Lady MacBeth.

We got a topper printed onto icing by the lovely Gill to go into the centre of the cake.  We wanted to go with understated elegance.  I know.  This is the person who usually makes princess dresses and pirate quilts.

Mam made the spice cake and put the marzipan on.  Then we started to decorate.  You've seen nothing like it.  Poor Mam's kitchen looked like a bomb site by the time we'd finished.  I've never covered a cake (or cake board for that matter) in fondant.  It took several attempts and lots (and lots) of patching and smoothing.  After putting the topper on, it was time for the piping.  Can I have a dramatic drum roll please?  I'd practised piping once and it went ok.  I then ran out of time to do any more practising.  You can see how well this is going to go, can't you?  Mam left the kitchen at that point.  She was then unsure whether she was supposed to come in everytime there was an exclamation.  On the whole she thought it wise to stay out of the way.  I can't say I blame her!

Cake complete.  We did debate whether or not to put some silver balls on.  Mainly to try to distract the eye from the piping.  But it was decided that less was more.


It wasn't too bad in the end.  Jayne's job is definitely safe though!  I'm not sure I can handle the stress levels for one thing.

For around the cake table at the party I made some personalised bunting.  The idea was that Gran could keep it afterwards as a memento.   No prizes for guessing Gran's name.


In the picture the bunting isn't quite finished.  I also stuck some purple bows onto the pegs.  Just because I could!

Now where are those Smarties?!