Pages

Monday, 28 April 2014

Dress for wedding

I was going to head this post as 'Wedding Dress' but I knew that would get people excited and jumping to the wrong conclusion, especially my Mam (Hi, Mam).  It's just a dress for me to wear as a wedding guest.  The wedding will be over in less than a fortnight and panic's really setting in now!

I finally decided that I wanted to make a dress with a fold-down back detail like this from Gertie's blog

She posted a tutorial on how to do this a while ago and I thought it looked fab.  After deciding how to do the back neckline of the dress all I had to do was make a decision on the front neckline.  Easy right?  Wrong.  I'm terrible at making decisions.  I dragged Mam around shops on Saturday looking at the necklines of all the dresses I could find.  She took it quite well.  We did have a small incident with a sales assistant who didn't seem to like us handling the merchandise without any intention of buying.  We had to sneak back later when she wasn't looking to see where the darts were on that one!  We eventually decided that just a plain round neck at the front would be best, keeping all the interest at the back.

So to work.  I drew a pattern and made part of a toile.  How good am I?  It was mainly to decide how big to do the opening on the back.  I want to be able to wear an ordinary bra without straps showing.  I had to get other half to help with this bit.  He took great delight in pinning up the back of the bodice and then leaving me trapped there.


See, partly made toile.  It's not much of one admittedly, but it's more than I normally do.  This is obviously the back view.  

After taking several deep breaths I cut out the real fabric.  It's just cotton, so it's nice and easy to cut.  It's also well behaved and stays where you put it.  After learning my lesson the hard way with my black spotty dress I made sure I interfaced and stay stitched around the neckline.  I cut a cream facing as a contrast for the fold back detail and cut a lining to fit the rest of the bodice.  I used the same cap sleeve pattern as I used for black spotty dress.  I will eventually post pictures of that I promise.  I'm off work this week so if the weather holds I might get to take some pictures then.  No promises though.  I know how disappointed you all are to read that!

I used a tutorial I've used before to make a nice clean job of the lining of the bodice.  It's here if you're interested.  It says for a sleeveless bodice or one with cap sleeves.  I've only tried it sleeveless before and part way through I wasn't convinced it would work, but it did.

 With the bodice and lining attached at neckline.
 Some seam matching at the shoulders.
 The point where I was very concerned.  Because you've got the sleeve trapped inbetween the neckline and the arm hole it won't sit flat and pinning is really interesting.
 Front of almost completed bodice.
 The bodice just needs the centre back seam finishing and the zip inserting.  Oh, and the buttons sewing on.
 Lined front.
 Close up of lining and facing.  That lining really is transparent isn't it?
 Close up of lined shoulder.  No puckers!
 I got a bit carried away taking photos at this point.  Sorry.  Not sorry enough to stop showing them mind.  I'm really proud of how neat the inside of this dress is at the moment.  I know, I need to get a life.  It keeps me out of mischief though.
Some more seam matching, this time under the arm.  

That's all for now folks.  I've got to draft the skirt next.  If I remember I might put pockets in.  The problem is I get excited when a projects nearly finished and have a bit of a race with myself to get to the end.

Friday, 25 April 2014

Updates

I've been quiet on the blogging lately because I've been too busy actually crafting.  And it's only going to get busier.  I've finished the black and white spotty dress.  I love it!  It's definitely the most wearable dress I've made for myself. I've had a couple of comments at work about it and I've done really well not to point out all the flaws and mistakes in it.  You're not going to get off so lightly though I'm afraid.  I need to get other half to take some photos of me in it.  I'm not sure I want to post pictures of myself, but fair's fair.  I'd have some done already but in the past week when I haven't been at work it's been really foggy here.  And I think it's going to be bad enough posing as it is.  Although, in the mist nobody would see me.  I didn't think this through fully.

I've just started this project in the past week


Recognise it?  Yes, Charlotte decided she wanted an Elsa dress for her birthday in May.  We've had tears.  From Katie.  Who doesn't think that Charlotte should get the same dress as her.  Charlotte has decided on a couple of changes.  She wants red sparkles on the cape and a bow on the front.  I'm really not sure how this is going to work out.  But, if it's what she wants, who am I to argue.  I'm just the slave.  Sorry, the adoring Auntie who loves to sew and make costumes for her two delightful nieces.  I think I was closer with the first description!  SShh.  Don't tell Katie, but the point at the front of Charlotte's bodice and the matching of the panel seams is loads better than the first one I did.


I should think myself lucky.  When I was looking for inspiration for Katie's Elsa dress I came across this website.  Charlotte saw this and wanted, I quote, "the pink one with the big bum".  By which she meant this


How amazing is that?  I think I dodged a bullet there mind!  I heard a couple of days ago that official Elsa dresses were sold out in Disney stores in America and were being sold for hundreds of dollars on Ebay.  I think I'm in the wrong business.  While I was in a fabric/haberdashery shop the other day I got talking to a lady in the queue who was on making her fourth Elsa dress.  I feel quite inadequate only being on my second.  

In a couple of weeks I'm off to a wedding.  I wanted to make my own dress and it's suddenly dawned on me just how close this wedding is.  Panic has started to set in.  I bought this fabric (hence the trip to the fabric shop).


I now just need to decide what to make with it.  I want the basic silhouette of the black and white dress, but with a fuller skirt.  I have no ideas on the details yet.

Also in the next few months I'm going back to my patchwork and quilting roots.  There's several babies on the way from family and friends so I'll be making quilts and blocks for them.  I also owe a friend of other half's family an outfit for their not-quite-so-new baby.  She was born before Christmas.  On top of all that I have my usual cards to make.  As well as a few special ones.  I think I need a lie down, and that's just thinking about all I have to do.  

Tuesday, 8 April 2014

Vampire Queen

Charlotte didn't know what she wanted to be for Halloween 2012.  We brainstormed for quite some time.  Eventually she decided on a vampire.  I'm sorry, a Vampire Queen.  Not just a common or garden vampire.  Now we just had to design an outfit. I quite fancied something Steampunk looking.  A kind of possessed Victorian child doll. With a cute teeny, tiny top hat.  I harbour a secret hope that I can get one (or both) of the girls interested in Goth or Steampunk so I can spend my days making corsets and bustles.  Everyone's got to have a dream!  I'm not sure their Mam would agree though.  Anyway, back to Charlotte.  Steampunk was out.  I found loads of dressing up outfits on t'internet for her to browse through.  She eventually picked something like this
She wanted a cloak though.  The fact that Katie had got a cloak when I made her Snow White dress was still a sore point.  Two years later.  These children have long memories.  I wanted to make a bigger collar with more shape to it.  More like this one

In the end we compromised.  She'd condescend to wear the collar if I made a cloak.  I thought a kind of Scottish Widows type cloak with a hood would be good.
So to work.  For the bodice I adapted good old Simplicity 2817.  I cut it short so it would be more empire line.  I ended up putting some very stunted darts in.  I wasn't sure if it would work without or not.  Better safe than sorry.  I used crepe backed satin for the most part, but I overlaid the red with some spider web tulle to give it some pattern.  The sleeves were slightly problematical.  I wanted to put strips down the puff sleeves so they looked like slashed sleeves.  It took me a while to work out that it was easier attaching the strips before gathering.  It seems so obvious now. The lower sleeves were also made of the spider web tulle. 

The skirt was made from crushed velvet.  I just made a long, slightly A line skirt.  The collar was also made from crushed velvet.  I adapted the Snow White collar.  The cloak was just an internet tutorial.  I have no idea which one.  There are a lot out there.  

On this outfit I think I put the most trim on I ever have.  There seemed to be gold braid everywhere.  I was concerned while making it that the dress would be too tight.  Charlotte insisted it was fine.  I just think she liked the fact that something was so close fitting on her.  This is a child that makes skinny jeans look baggy!  She did manage to squeeze into it last year for Halloween as well, but I think she's finally outgrown something I made.  I never thought I'd see the day.


And finally a vampire (queen, notice the tiara) and her pet cat!


Scary or what!

Sunday, 6 April 2014

Current project

A year or two ago I bought a dress similar to this from Mela Loves London.
I LOVE that dress.  I have a thing for spotty fabric.  I've worn and better worn my spotty dress and it's finally protested and given up.  Boo!  The stitching's come away under the arms (again).  I've already repaired it once, but I think it's beyond hope now.  There is a point to this story by the way.  One of the reasons I started sewing was because I'd love to be able to just make a dress or outfit for myself.  You know, with no particular thought or planning, but just see something and think "I can make that".  I've made a few dresses for myself but most of them haven't been what you'd call roaring successes.  Of  those that have been relatively successful two were versions of the Crepe dress by Colette Patterns
which is a wrap dress and one I drafted myself last year.  These are the only ones that have been worn in public.  The main problem seems to be that I'm just completely the wrong shape for commercial patterns.  I'd have to make so many adjustments to them that I end up with something that bears no resemblance to the original design.  I'm short (5' 3") and a lot more curvy than your average sewing pattern allows for.  I do often have the same problem with off the peg clothes too.  If it's not stretchy and it fits at the waist there's no way it's going to fit around my bust and hips.  If something fits my bust and hips it makes me look shapeless and as if I have no waist.  I think the way forward (for sewing at least) is to draft my own patterns.  Then, hopefully, everything will fit where it should.

Back to my spotty dress.  Last year I bought some black and white spotty fabric
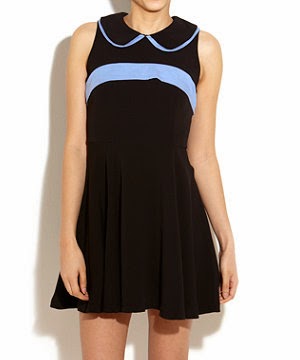
with the intention of making something similar to my favourite dress.  Of course it never happened.  Then my dress died.  Something had to be done.  I should point out here that I love vintage inspired dresses.  I could happily spend hours browsing on Modcloth.    Last weekend I decided that I had a few weeks free between other projects.  Surely now was the ideal time to use that spotty fabric. By then my original thoughts for design (a straight copy of the Mela Loves London dress) had morphed into something more retro looking.  I'd also decided I wanted to do a double collar, something like this from New Look.
Armed with my bodice block I set to work.  I changed my block to just have darts coming from the waist (I've no idea why, it just seemed like a good idea at the time.  I drafted a cap sleeve pattern using this tutorial.  I then (shock horror) made a toile.  Well part of one anyway.
This is my dressmaker's dummy.  My other half calls her Headless Sandra.  I think I need to come up with a better name for her.  She wears a manky old t-shirt to accommodate the padding that she needs to make her more like me.  She's not as well endowed as I am!  The darts at the bust aren't as pointy in the real bodice, it's made of a much softer fabric.  Don't worry, I'm not going for a Madonna look.
And that's my sleeve.  I'm so proud.  No, seriously.  Other Half kept laughing at me as I looked over to admire my sleeve.

On to the scary part.  Cutting out the real fabric.  It usually takes me a few days to work up courage to do that.  But this time I just went for it.  I drafted my collar using instructions from Gertie's book.  I made two layers of collar, slightly different sizes.  I interfaced the top layer of each collar and sewed them on to the neckline.  It was then I realised I hadn't put interfacing on the neckline of the bodice itself.  This means that the neckline's stretched a little bit.  I wouldn't recommend trying to iron interfacing on to the neckline of a bodice after the collar's been sewn on.  It was interesting to say the least.  And it's patched in places.  Never mind, no-one's going to see once it's lined.  Because the neckline had already expanded the carefully drafted collar doesn't meet centre front and back anymore.  I quite like it with the gap.  If anyone asks, it's a design feature.
 I didn't have the dress sat right on the mannequin, hence the baggy side.  It does sit better in real life.
 I'm very proud of my collar.
  Now I just need to add a skirt, lining and zip.  I'll keep you posted.

Saturday, 5 April 2014

I want a cat-up dress!

Autumn 2012.  Katie announces that she knows what she wants for Halloween.  This was news to me.  I didn't even realise I was making outfits until that moment.
"I want a cat-up dress."
"A what now?"
"A cat-up dress."  As if it was perfectly clear what she meant by this.
 We eventually decided she must mean a cat dress-up.  She obviously had a very clear idea of what she wanted as well.  Clearly some thought had gone in here.  I assumed (foolishly, as it turns out) that she wanted something like this

Or this


You know, cute little tutu type skirt, tail and ears. Something quite girly. But no.  This is Katie we're talking about.  She wanted something like this
No princess dress pattern in the World was going to help here.  I found this Simplicity pattern to try to alter.
Simplicity 2855.  I think, although I couldn't swear to it, that I took the pattern in down the sides.  I know I shortened the legs and arms. Too much as it turned out. Apparently that's not how you're supposed to adjust raglan sleeves.  Never mind, she wanted white "fur" around the cuffs anyway.  I just had to add a bit extra.

I moved the zip from the centre front to the centre back.  I assume it was down the front for ease when dressing of yourself, but Katie would always have someone around to help.  I didn't fancy trying to insert a zip in fluffy material and thought it would get caught up when she was trying to open and close it.  I also thought it looked just plain daft.

I just cut an oval of fur for the front, rather than the slightly heart shape of the pattern.  I didn't make the hood or the shoe covers.  Katie was just going to wear black shoes or boots and I didn't think they'd survive too well in wet weather.  For the ears I covered a hairband in the black crushed velvet and made some ears to sew on.  It was a bit of trial and error to get them sewn on so they stood up and you couldn't see any raw edges.

And here she is.  Cat with attitude.
You can see that the arms and legs are a bit short for her.  But she still managed to wear it the next year as well.  When she went out 'Trick or Treating' she became a vampire cat.  No prizes for guessing what Charlotte's outfit was!

Sunday, 30 March 2014

Enchanted

April 2012.  Charlotte's birthday fast approaching.  At the time her favourite obsession was Disney's 'Enchanted'.  For those not in the know, it's a 2007 mainly live-action film.  Giselle finds herself transported from Disney animated princess world into modern day New York.  Several other characters follow and chaos ensues.  It's actually quite good.  I've even been known to watch it without a child present.  Should I really admit that?  Perhaps not.  At the time Charlotte enjoyed acting scenes out, often while watching the film.  She was often heard asking for a poisoned apple.  Hopefully not in public.

Giselle spends part of the film (both animated and live-action)  in the world's biggest wedding dress.  'Big Fat Gypsy Weddings' has nothing on this number!


Look at those sleeves!  And the size of the thing!  This one was going to end up more 'inspired by' than a faithful recreation.  Charlotte did want it big enough so she didn't fit through doorways.  I pretended I didn't hear her.

For the bodice I used (yes you've guessed it) Simplicity 2817.  I've had my money's worth from that pattern.  I think I may have bought it in a sale as well.  I just made it in plain white crepe backed satin.  I changed the zip in the back to an invisible one.  Have I mentioned how much I love invisible zips?  Best. Invention. Ever.  For the sleeves I used the same pattern but I made the pattern HUGE.  I more than doubled the size.  I wanted them to be MASSIVE.  Then I sewed them up and attached them to the bodice.  Frankly, I was a little disappointed.  I dread to think how big the pattern pieces were in the original.  They're ok.  They just don't have quite the impact I was hoping for.

Then came the skirt.  I was very confused by those ruffles.  I used net for the frilly bit, but I had no idea how to make the ruffles fall properly.  I experimented with strips of net quite a lot.  But to no avail.  Searching the internet I found this site.  Which includes a link to this amazing tutorial.  It wasn't strips I wanted, it was spirals.  Lightbulb.  A hasty measure of the net I had  to see how many spirals I could get.  I have a terrible habit of buying fabric and then deciding what and how I'm going to make something.  It's generally because I've left things so late I'm ordering fabric and drawing up patterns at the same time.  Bad Auntie Sandra.  As it tuned out I didn't have enough to go all the way around the skirt.  So I thought I'd put them in the front and around the sides and make an underskirt to stick the rest out.  This plan didn't work out either.  Because the net was quite stiff the front and sides stuck out massively.  The underskirt wasn't necessary.  The dress is slightly flattened at the back, but fortunately princesses don't have eyes in the back of their heads!

I drafted the overskirt myself.  It's A-line type panels (so it fits the bodice at the waist and then flares out) with shaping at the front.  It's also set off centre.  I think I should have made the opening bigger or more to the side, but never mind.


Completed dress before decoration.  I then added sequins and gems.  


I also made a butterfly and flower.  The flower's detachable but the butterfly's sewn on.  You can see them best in the animated portion of the film.

And here we have the birthday girl.


You can just about see the butterfly on the neckline and the flower at her waist.  That's Charlotte's elegant ballerina pose by the way.


And then the other niece wanted in on the action.  This is her demure look. 

I did have loads of photos of the making of this dress and other shots of the children in it, but the computer took poorly a while ago and I lost them.  Boo!

On the whole Charlotte loved her Giselle dress.  Even if she could fit through doors.  It's one of the most worn of their dresses.  White perhaps isn't the best colour for a princess dress though.  

Wednesday, 26 March 2014

The Little Mermaid

So after Katie got her pink Ariel dress for Christmas 2011 she still wanted a green tail and purple bra for birthday.  We did try to persuade her that it still wasn't age appropriate (to be fair, I'm not sure when it would be), but she wasn't having any of it.  She was at this point obsessed with 'The Little Mermaid'.  I'm fairly certain that's what she wanted to be when she grows up.  Not much has changed mind you.  In the end I caved.  You can't really argue with an almost 5 year old about princess costumes.  It was obvious that she wasn't going to stop asking until she got one.  I was just going to have to bite the bullet.

It was around this time that we found out her plans for her tail and bra.  She wanted to wear them in the bath!  I assume she was going to splash around a bit too.  Funny as the idea was, we did have to tell her that even if she did get a mermaid tail (and bra) she wouldn't be allowed to wear it in the bath.  This caused not a little consternation.  After a lot of thought and soul searching (all of about 2 seconds) she decided that she could live with that.  A green tail and purple bra it was.
How to make a mermaid's tail?  I had no idea.  By this point I thought I could probably tackle most princess dresses, but a tail was something else entirely.  I couldn't use faithful Simplicity 2817.  I did come across a few mermaid type patterns, but most of them involved a long, tight skirt flared at the bottom rather than an actual tail.  Luckily I found this
The tail part looked great, but I could imaging Katie's reaction if I tried to make her one of the tops.  I know, they're much more suitable for a 5 year old, but she wanted a bra.  Unfortunately you don't find many bra/shell top patterns for children.  I was going to have to wing it with that one.

The tail I just made from the usual crepes backed satin but I overlaid it with some green net type stuff with sequins.  The fin of the tail has wadding in between the top and bottom layers.  The swirl design is then quilted through the layers and the sequins are sewn on top.  I'm no good at sewing sequins on.  When they're in a long strip I just can't seem to stop them falling off the thread.  I've tried knotting the ends of the thread, gluing the threads, tucking the ends under and sewing, all to no avail.  If anyone has any top tips I'd love to hear them.  I think the only change I made to the tail pattern was I didn't put a zip in the waistband.  There seemed to be enough stretch with just the elastic.

For the bra I just made it up as I went along.  I had no idea if it would work or not.  I made shell-shaped pieces (try saying that 7 times fast!) out of crepe backed satin and used wadding and sequins like on the tail.  For the straps I made long tubes of fabric and threaded elastic through them.  The only problem was figuring out how to attach the shoulder straps to the bodice strap and still being able to stretch in all directions.  In the end I just looped the shoulder straps over the bodice strap and sewed them back on themselves.  This means they can move around on the bodice strap which is what I wanted.

So here she is.  Our Little Mermaid.  I'm having the same problems as before with editing the photos I think it's because they were taken on a phone, so I'm afraid you're just going to have to put up with in their uncropped state.  You will note that Katie/Ariel is posing on her 'rock'.  Also known as a foot stool.  She refuses to walk when wearing the tail.  There is an opening down one side to stick your legs through and a loop to hold it up with.  Katie's comment when she saw the opening was "Can you not just put a zip in it so I'm like a real mermaid?"  Er, no Katie, it doesn't quite work like that.
I think overall she was pleased with the outfit.  Even if we wouldn't let her in the bath with it on.